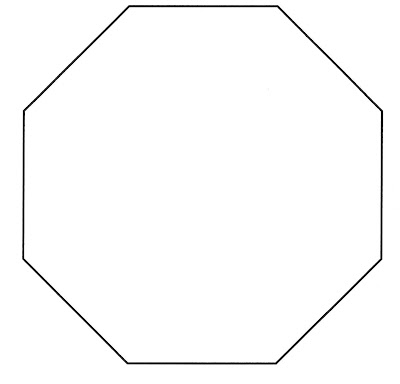

 This is the template for making the octagon exploding box... right click and save it to your computer.
You will need to insert the picture into a Word document to be able to use it.
Once you have it inserted into your Word document you need to make three different sized templates from it.
 In your Word document, if you right click the picture of the octagon you will get a drop down box and one of the options is size. Click on this and you will get a window like the one in the screen shot...
The largest octagon is 15cm so using the height option, change it to 15cm. Print this off.
Repeat this to make the medium size of 11 cm. Print it off.
Repeat once more to make the smallest octagon of 9cm. Print it off.
Take the largest template and stick it to your 12 x 12 sheet of cardstock with temp Herma.
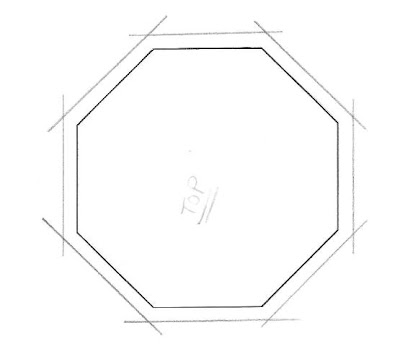
Now take your ruler and lay it across the template at opposite angles and draw lines to make the 'legs' of the shape as in the picture above.
The largest template has legs 3 1/4" long.
The medium template has legs 2 3/4" long.
The smallest template has legs 2 1/4" long.
The scribble bits will be removed when you cut it out.
Repeat this for the other two sizes. Score the legs so that they fold upwards.
Are you still with me? ;)
Your three sections are now ready to be decorated with pattern papers.
You will need to adhere the medium section to the centre of the large one, and you can either offset them as I have done or keep them lined up. I like the flower effect of the offset look.
Now adhere the smallest section to the centre of the medium one.
 To make the lid, I used the large template and added an extra 1/8th" to each side so that it would sit on top of the bottom bit nicely.
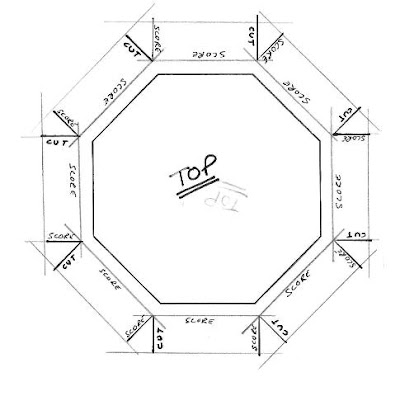
 Now... when you see the next photo... don't have a hissy fit... it is simpler than it appears!!
Place your ruler across the template just like you did to make the 'legs' and draw in the straight lines. these are the score lines. You need to cut one, score one, so that you have small triangles to glue to connect the pieces and form the rim.
 I decorated the rim with ribbons glued down with DST and this also ensure that nothing comes apart when you start to use it.
I also cut another smaller rectangle out of cardstock and sat this platform onto the top of the lid with foam pads.
Add your papers and decorations and it is ready for the photos and journalling.


Annette, this is gorgeous! Thank you so much for taking the time to work out these instructions! I will have a go .... will report back in about a month lol!
ReplyDeleteI knew if anybody could, it would be you! Thank you so much! I am definately going to try this one. It might have to wait for school holidays though. LOL
ReplyDeleteyou are amazing writing these out ... thanks annette, when i get 5 mins i will try and make one.
ReplyDeleteThanks, VV.
ReplyDeleteClear, easy to follow and with a gorgeous finished product to inspire us .... well, what else would you expect!! luv.F.
I'm amazed, absolutely amazed at your patience and talent Annette. This is a gorgeous box... but I'm hoping my eldest doesn't spot your instructions! LOL!
ReplyDeleteGreat tutorial - I'll definately be having a go at that over the summer!
ReplyDeleteThere's an award for you on my blog :0)
Fab Annette! Now I understand why it gave you a headache!!!!
ReplyDeleteTotally amazing Annette, you definately get a GOLD star for your hard work and patience.
ReplyDeleteI will definately be trying to do this box in the near future.
Brilliant instructions.
Thankyou :o)
XXX
You're too clever by half, Annette!
ReplyDeleteOh my goodness ... when my MOJO went a wandering I should have just come on here ... How clever are you smarty pants? ... I am lost for words [most unlike me!] Your octagon exploding box is awesome ... way to go Annette X
ReplyDeleteThis is lovely. Thank you for sharing the instructions.
ReplyDeleteI'm not normally into these boxes but yours are SO beautiful that it is encouraging me to try. Kind of you to post the instructions for us meer mortals lol.xx
ReplyDeletethis box is yummy, thanks for sharing the instructions.x
ReplyDeleteAbsolutely stunning. Not much else i can say! :) x
ReplyDeleteYour box is quite beautiful! I love the colors and all the flowers.I
ReplyDeletefound your blog post while doing a search for exploding boxes. I made one of my own, and have linked back to you directions.
Thanks so much, it was great fun!
hugs,
Pam
Absolutley Gorgeous!!! I love the colours you have used and thanks so much for sharing the instructions.
ReplyDeleteBig smiles to you
Kylie
Thanks for these instructions... Have just finished making one as a gift for a friend's daughter & it looks great. I hope she likes it!
ReplyDeleteThanks for these instructions... Have just finished making one as a gift for a friend's daughter & it looks great. I hope she likes it!
ReplyDeleteHello, fab tutorial, thanks for posting it :)
ReplyDeleteQuick question, when sizing it, is it only the height we change to 15cm, 11cm and 9cm as when I change mine, the width isn't those sizes. I also see in your screenshot that the scale is 40%, mine is about 149% so I'm concerned that it may come out the wrong size!
Also, how do I make the sides weighty enough to fall open nicely? I tried to make a square exploding box and the sides just dropped really slowly and stopped about halfway!