Sunday, 28 June 2009

Chipboard Book

A mini book I made for a little girl down in the complex who had a birthday last week. She loves popping in here to see what I have been up to and loves to do anything crafty, so I thought she might like this to put her summer holiday photos in.
It started out as a child's board book. I pick these up in charity shops when I see them, they make great mini books or just chipboard covers - 3 pairs from one book!

I learned the hard way not to just leave the book intact and try to decorate it... my pages tend to be on the 'fat' side and the board book usually ends up not closing at all. I now remove the pages from the spine and trim them up and punch them with the BIA.


Because the books are made for very young children they tend to have a very shiny coating on them so that sticky finger marks can be wiped off... this makes adhering paper to them a tad more difficult so I always give the pages a good sand down so that adhesive keys to them.

I also made her a little box to keep the book in. I thought if she collected stuff from her holiday, postcards, pictures etc that she has somewhere to keep them all ready for when she starts to fill the book up.

Lots of pockets and tags for her to journal and add things.


I used Luxe papers for this project and a 1" red o'wire.

Sunday, 21 June 2009

New Home Card


So my son moves into a flat on his own next weekend, to date he has always shared with Uni friends, so this will be a very new experience for him. Couldn't find a new home card in the local shops so I have had to make one.... now don't laugh... you see that blurb about me on my blog? It doesn't say card maker... it say I love to make mini books!!

On the inside I made a recipe card for a really quick and easy pizza that takes 10 minutes from start to finish.


and a pocket with a tag wishing happiness in his very own space and some money to get some food... which hopefully will make up for the dire attempt at card making!!

Monday, 15 June 2009

Octagon Exploding Box Instructions


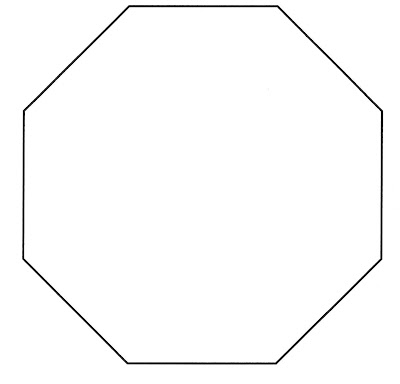
This is the template for making the octagon exploding box... right click and save it to your computer.
You will need to insert the picture into a Word document to be able to use it.
Once you have it inserted into your Word document you need to make three different sized templates from it.
In your Word document, if you right click the picture of the octagon you will get a drop down box and one of the options is size. Click on this and you will get a window like the one in the screen shot...
The largest octagon is 15cm so using the height option, change it to 15cm. Print this off.
Repeat this to make the medium size of 11 cm. Print it off.
Repeat once more to make the smallest octagon of 9cm. Print it off.
Cut your templates out.
Take the largest template and stick it to your 12 x 12 sheet of cardstock with temp Herma.
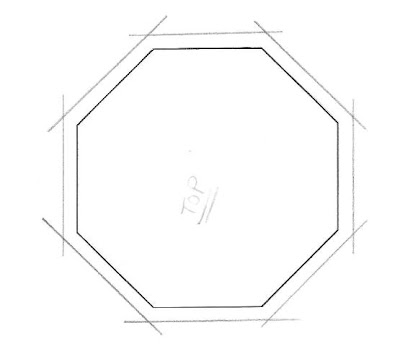
Now take your ruler and lay it across the template at opposite angles and draw lines to make the 'legs' of the shape as in the picture above.
The largest template has legs 3 1/4" long.
The medium template has legs 2 3/4" long.
The smallest template has legs 2 1/4" long.
The scribble bits will be removed when you cut it out.
Repeat this for the other two sizes. Score the legs so that they fold upwards.
Are you still with me? ;)
Your three sections are now ready to be decorated with pattern papers.
You will need to adhere the medium section to the centre of the large one, and you can either offset them as I have done or keep them lined up. I like the flower effect of the offset look.
Now adhere the smallest section to the centre of the medium one.

To make the lid, I used the large template and added an extra 1/8th" to each side so that it would sit on top of the bottom bit nicely.

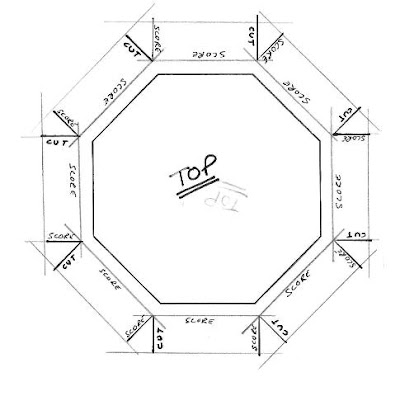
To make the lip of the lid I used the width of my ruler and drew lines as in the photo above.
Now... when you see the next photo... don't have a hissy fit... it is simpler than it appears!!
Place your ruler across the template just like you did to make the 'legs' and draw in the straight lines. these are the score lines. You need to cut one, score one, so that you have small triangles to glue to connect the pieces and form the rim.
I decorated the rim with ribbons glued down with DST and this also ensure that nothing comes apart when you start to use it.
I also cut another smaller rectangle out of cardstock and sat this platform onto the top of the lid with foam pads.
Add your papers and decorations and it is ready for the photos and journalling.

Sunday, 14 June 2009

Octagon Exploding Box


I have made a few of the normal exploding boxes and I even made a pyramid exploding box but when I saw an octagon exploding box.... well! Only problem was that there were no instructions or even measurements to go on... so I sat with some cardstock and a ruler.... and after 2 Nurofen to get rid of the headache, I produced this!!

As soon as I have it all written down, I will add some instructions! ;)


This is a pyramid exploding box I made some time back for a good friend, it contains photos of here LO's of her pets.


This is a square version I made about our trip to Victoria Falls for my 50th Birthday!

Saturday, 13 June 2009

Monogram and Notebooks

On UK Scrappers we have a BIA Social Group where all the BIA addicts chat and exchange ideas and help each other out. When we get a newbie arriving saying she has boght a BIA and now doesn't have a clue what to do with it.... we all say get it out of the box and play.... make some notebooks to get the feel of the machine, see where the punched holes end up, try out the o'wires. It doesn't have to be anything fancy, just some chipboard from cereal packets etc to get some experience. Well, this is how I started making these... they are just any empty packets I happen not to have thrown in the bin (I really must stop hoarding stuff) and I thought they would be cute on the fridge as shopping lists!!
I was looking through the boxes of stash (as one does) and found this bare wood monogram letter A and thought I would give it a facelift with some paint and BG papers to match the scraproom clipboard I made a few weeks ago.

Friday, 5 June 2009

Teabag Mini Book

Another Zutter's DT piece which I made for my Mum. Finally got an email from her today that it had arrived in the post so I can put the pics up for it now - Mum pops onto my blog so I didn't want to spoil the surprise!

I have filled it with Hibiscus teabags as both Mum and I were given this to drink when we were on holiday in Egypt in March and loved it! It's the first tea of this sort that I actually enjoy drinking.

I decorated the pockets with images of high teas and little saying about tea.

I have posted instructions on how to make this version on the Bind-It-All blog here if anyone wants to give it a go.

Tuesday, 2 June 2009

Instructions for the Organiser

I have been asked if instructions were available for the organiser I made for the June BIA DT so I have done some. Now, don't be alarmed when you look at the photos as I have done the instructions after making the organiser so just made up little dummy ones to show you.... follow the measurement given and yours will be the correct size! ;)

You will need the following:
Materials
2 pieces of chipboard 8 ¼” x 5 ¼”
5 sheets of patterned paper 9 ¼” x 6 ¼”
4 sheets of cream cardstock 10 ¼” x 8 ¼”
1 piece of cream cardstock 9” x 4”
1 notebook 8” x 5”
1 metre of ribbon for the ties
Patterned paper to decorate front of pockets, ribbons, flowers, brads, beads etc
Letters for the titles of the pockets and cover
Instructions
1. Cut two pieces of chipboard 8 ¼” x 5 ¼”
2. Cut two pieces of patterned paper 9 ¼” x 6 ¼”. Glue your paper to the chipboard and then score on all four sides.

3. Trim the four corners and attach double side tape (DST) to the edges.

4. Cut a strip of cardstock 9” x 4” and score at 1” intervals to make valley and mountain folds. Attach this to the edge of the chipboard covers halfway down with DST.
5. Take your metre length of ribbon and place it across the centre. Now add DST to all the edges avoiding the ribbon (you do not want the ribbon to get stuck to the tape).
6. Cut two pieces of patterned paper 8” x 5” and place onto the inside covers making sure the ribbon doesn’t get caught on the DST. The ribbon must be able to slide freely between the covers when you are finished.
7. Cut four pieces of cream cardstock 10 ¼” x 8 ¼” and make pockets.

8. Using a circle punch snip a half circle into the top of the pockets.

9. Using the offcuts of cream cardstock you can make tags to put in the front pockets. Using a corner rounder on the top two edges, attach ribbon and decorate.
10. Cut four pieces of various patterned papers 4 ¾” x 7” and attach to the front of the pockets.
I have added extra pockets to the front of these to take extra tags, notes etc.

11. Make a patterned paper cover for your notebook and then punch holes in it with your BIA. Punch matching holes in the front top chipboard cover and then bind the notebook into place.

12. Embellish and decorate the notebook and pockets as you wish. Add the descriptions to the pockets and a title to your front cover. I added crystals following the shape of the flower on the paper. Add beads to the ruffle of the ends of the ribbons to decorate if you wish.
Now you can start to use it and hopefully always know when something is due to be paid!

Monday, 1 June 2009

Organiser

Another BIA DT Project which I made to help me keep organised with all the things I have to remember with regard to our home in Scotland. Yep, insurances for the house and car plus tax and services and bills still come due and keeping track of them all can be quite a task, so now I am hoping that with this it will all be plain sailing!! ;)

I have added a notebook to the inside cover to remember phone conversations etc and the folders are on a concertina spine so they all unfold in a row so that I can see everything at a glance.
Each of the sections is a pocket so that I can put bills or receipts or reminders into them which should help to keep me straight.
I have added another pocket to the front of them so that a tag which keeps the dates or reminders can be added.
I used BasicGrey papers for the project so hopefully as its pretty I will actually use it!!