Wednesday 28 September 2011

WOYWW and Yellow Pages Fairy Tutorial

This could be regarded as a bonus feature or whatever the opposite is to a bonus feature... but it is Wednesday which means that it's that time to reveal desks in all their gory detail to be perused by like minded souls and you can find all the details at the desk of our leader, Julia.
So on my work desk is an empty cup of tea.... where's a good tea making fairy when you need one?? Also there is the pile of freshly cut golden dress forms ready to be turned into Yellow Pages fairies!! Looking at my green mat I think a new one could be top of my Christmas list... it is looking decidedly grim with ink and cut marks!
So Neet asked if there was a tutorial for making the Yellow Page dress forms and as I have 9 of them to make I thought I might as well document it so if anyone wants to have a play, they can!!

Yellow Pages Fairy Dress Form
You will need:
 to 'borrow' a copy of the Yellow Pages from somewhere.
 a Tim Holtz Sewing Room Die
a butterfly die
a Cuttlebug
a glue stick
Glimmer Mist
Inks or metallic felt tip pen

Grab your Yellow Pages and cut strips about 3” wide from your chosen pages.  Do not feel bad about the Yellow Pages, this is a form of recycling... you Google everything you want to know anyways!!
If you are making one fairy you will need about 25-30 Yellow Page forms and one chipboard base form. I found that about 10 forms of the Yellow Pages can be cut at once without any problem at all.

Cover chipboard base with your chosen paper... I used a piece of the Yellow Pages for my original one because you really aren’t going to see very much of it. If you use a glue stick and stick the paper to the chipboard and then put it through the Cuttlebug you get a perfect cut out already papered... you can choose to cut both individually and faff about getting it on their perfectly if you wish but I have 9 of these to make...
Cut the stand and the little nob at the top off of your paper dress forms leaving yourself with a torso. oooh, that sounds all CSI and grim...
Take a slurp of your Capuccino Mocha and tell yourself that a few hundred of these dress forms will be a piece of cake (go get yourself a piece of cake if it helps and whilst you are in the kitchen get me a piece too)!
I tried inking the edges and it was a bit hit or miss.... the paper is very thin so I opted to using a copper marker and drawing around the edge of the forms.... all of them... (then take a painkiller because your tendonitis is really giving you jip at this point)...
Once you have your lovely little pile of outlined forms you can start!!
Fold each one in half longways...
Get your glue stick and take the first YP form... run glue stick along the straight edge... not too wide or your pages will glue together and that is not the look we are going for...
Put next form on top and then glue stick that along the straight edge... and keep going until you have done all  of them... you will find that you have excess glue stickiness along the border and this is good... it helps to hold it all in place.
Place your pile of body forms on the centre line of your chipboard form, it will sort of stay in place because of the excess glue ;)
Fold out the bottom right hand half of your pile and glue onto the chipboard form.  Do the same for the left hand side and now your pile will splay out evenly. Voila!!
I used a butterfly die cut in half for wings and glittered them up a little and attached them to the back of the fairy.
You can now decorate it as you wish... a little Glimmer Mist sprayed over it adds sparkle.

You now have your Yellow Pages Fairy... and I have 8 more to make... 

Monday 26 September 2011

That dress form once more...

Are you sick of it yet?  No?  Neither am I!! ;)   I was looking at the chipboard cut out of the dress form this morning and wondering what else I could do with it.... as one does.... and did you know that if you chop her off at the waistline you have a really good lamp?  No?  Just me then.... and if you then chop the neck bit nice and straight you have cute little dish and a lid!!
How cool is that???   You could leave the lid off and fill the top with little flowers... 
and I gave the yellow pages fairy some wings and I really do like her now.
and I found some lovely bright papers and made a '60's style fairy...  

Saturday 24 September 2011

Umbrella Man and Dress Form....

OK... you can relax... they are not on the same project!! ;)  Mind you, now I may have to figure something out that would incorporate both... LOL
So... I bought brollie man... it's all Dan's fault as he has been tempting me with fabby images of brollie man for a couple of years but we both know that I don't 'do' Dan's style, well, not so much don't as 'can't' as it always turns out looking like I have dumped whatever  'it' was in a mud puddle.  But... that didn't stop me buying brollie man when the opportunity arose so I thought the right thing to do was make Dan pay for luring me into brollie world something with the it... and I did masking.... and sponging.... and spraying of mists... and I actually quite like it!! ;)

and now back to normal me.... and the dress form!!
I'm still working on Christmas fairy ideas for the swap... the Yellow Pages fairy is probably the one but I have to try a few options before embarking on destroying all the Yellow Pages in the street...

Friday 23 September 2011

That dress form again...

I have been playing with the Tim Holtz dress form all day... trying to come up with a version that I can use for a Christmas Fairy swap I have joined...
For some reason this one reminds me of Blackadder...
How about a fairy in a gold ballgown aka the bird cage die!!
I tried to do something with the book page version... I love the colour!!
My personal favourite is definitely the Yellow Pages version... it needs fairy wings though...


Thursday 22 September 2011

Tim Holtz Dress Forms

I have been playing with my Sir Tim Sewing Die with the dress form on it... and at 2 a.m. this morning I had a thought... so I got up and tried it out...
I tore pages from a Chinese version of Gone With the Wind and had a play with them... you see, I have no problem ripping pages out of books in Chinese... I figure I am never going to want to read them!! ;)
I wasn't entirely happy with her... she still needed something so I gave her a spray with some Tattered Angels glimmer mist... hmmmm, still not sure....
So then I went off to Chris' study and dug out the Yellow Pages... the paper is already a lovely aged yellow and its very thin... so I cut heaps of the dress form shape and I like this version much better... 

Wednesday 21 September 2011

What's on You Workdesk Wednesday 21st September 2011

Jeepers creepers... I have been a busy bee today!!  I woke up and decided that I needed to move the scrap room about so that I got some actual daylight on my desk.... so I have pushed and dragged and shoved and emptied and refilled and it's done!!  OK... nearly done as I am still sitting at my computer desk which is in the same place and needs to be moved but I am a scaredy cat... Chris is away for two weeks and if I don't put the pc back together properly I will be without the interwebs until he gets home.... 2 weeks without the interwebs is not something I wish to even think about... maybe I'll just wait for some poor unsuspecting visitor to ring the doorbell and then get them to help me move the entire desk with everything still connected...

So this is where the desk started the day off...
and under that window is where I want it to end up...
and this is the mess I made moving everything about...
but by mid afternoon things are beginning to look a bit better and Pandy decided to investigate all the new spots that can be climbed up...
and here she is trying to decide if she could make the leap to the other work desk...
but most of the time she sat quietly...
and TomTom just wished I could do all the moving quietly...
So this is my new corner set up... and the window light makes a huge difference!
and the other desk which gets used for larger stuff that requires laying out.
and here it is all tidy and sorted once more...
and the lounge area is now moved over to where the desk used to be.
I did manage to finish my cotton reel made from a gravy tub before I started moving everything about.
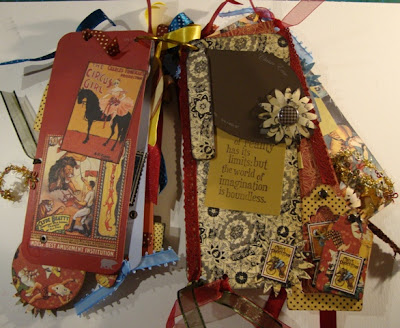
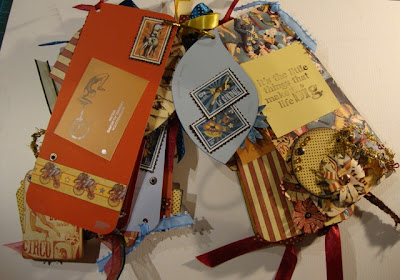
It's Graphic45 Le Cirque papers
and when you lift the lid there are some hanging bits... a penny farthing is in the centre.
Don't forget to check out all the desks over at Julia's!!

Saturday 17 September 2011

Alice in Wonderland Jigsaw Swap

I joined an altered jigsaw swap at UKScrappers... to simplify things we all make the same pieces on our jigsaw and then send them to Netty who gets the fun job of dividing them up and returning them.  I chose Alice for my theme, others are doing the Mad Hatter, the talking flowers etc.
So this is what mine looks like with all the Alice pieces!!

This is an close up... I used texture paint on the chipboard and then coated this with tissue paper.  I printed the Alice image onto tissue paper and added to the background.  Made some flowers from 7Gypsy map papers and embedded a mirror (to represent the looking glass) and then got little glass phials and filled them with beads and coloured liquid.  I added the 'drink me' tag as the final touch and now I can post them off!!

Wednesday 14 September 2011

What's on You Workdesk Wednesday 14th September 2011

Gosh... a whole week and it has disappeared on me... I have been playing with some large jigsaw pieces that are for a swap... the theme is Alice in Wonderland so that is what is all over my work desk... a big fat mess of Alices!!
Hmmm... they don't look much at the moment, do they?  I have done the paint them with texture paint stage, and the cover with tissue paper stage, and the add Alice printed on tissue paper stage... I am at the sanding all the edges stage then I have to do the flatten like a pancake stage.... then comes the fun bit of actually making them look pretty (hopefully)!!
Speaking of Alice... have you seen the new version of Alice in Wonderland by Tim Burton?  You should... it's brilliant!!  Chris and I watched it yesterday in the hope that it would give me that extra inspiration... we will have to wait and see if it worked!! ;)
On my other desk are some of the purchases that I got from my latest trip to the scrap book shop.... I was in search of a Bigshot die of angel wings but they didn't have it! :( 
but they did have the umbrella man and the tattered florals die and they just fell into my basket!!  Can't wait to play with umbrella man... just need to finish the jiggie pieces first!! 
Don't forget to pop into Julia's for the linky list of fellow crafters who reveal various desks in various states of tidiness and lots of lovely things to look at!!

Wednesday 7 September 2011

What's on You Workdesk Wednesday 7th September 2011

My work desk is looking relatively tidy this week as I have just finished playing with my Graphic45 Le Cirque papers...
Just a few bits and pieces left out that I haven't quite decided what to do with... that is one of my problems, I have no idea when something is finished... if I leave it there I will go through and add some more... and then some more!!
This was a fun project that I have been meaning to do for ages now... well, ever since I went to buy paint and picked up a huge wadge of paint chips (in fact, the wadge was so fat that Chris decided he wasn't really with me and made go through the check-out on my own)... in the UK they are skinny stripes of varying paint colours but out here they give you BIG one colour chips.... they are gorgeous!! This brand of paint (Behr) even has little leaf shapes that pop out of each chip and let you have plastic rings so that you can snap them all together... it's almost as if they want you to collect them all!! 
See what I mean?  This particular make is my favourite.. the rectangular ones are about 3 1/2" x 8" and the lovely shaped ones are about half that size.
So I simply covered the backs of them with the le Cirque papers...
and made a pair of chipboard covers in the same size...
I decided to use a bookring to hold them all together as I wanted them to be able to move freely.
Added lots of ribbon and chipboard shapes to the pages...
Made flowers from the papers and used more paint chips for the stamped words.
As you can see, I didn't want to disguise the fact that they were paint chips, I think it adds to the circus feel of it that it is unusual to have the names of the paints on the pages.
It was fun to make and is fun to flick through.
Don't forget to pop over to Julia's for all the details of WOYWW and the links to all the fabulous desks!